-
-
Download the Profiler Utility software which is available at the following link
-
-
-
-
Install Profiler Utility from Aeroqual supplied zip file by Clicking on the "Profiler Installer 1.9"
-
If prompted by Windows attempting to protect your PC, click "More info", then click "Run anyway". This will start the Profiler Utility Setup Wizard
-
Click next several times to start the installation. Click "Yes" when prompted to allow the program to make changes.
-
When the installation is complete, click the "Close" button
-
-
-
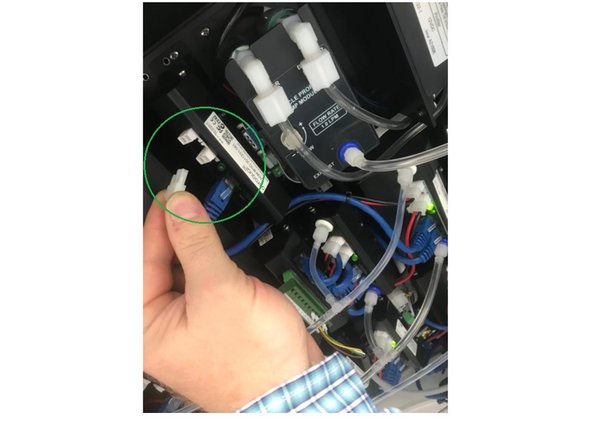
Disconnect the 9-pin female cable from the PP8 or M1IO module, leaving the 9-pin male end plugged into the Profiler engine. Plug in an appropriate USB-Serial converter into the ribbon cable. Alternatively, if your USB-serial cable has a sufficient length, you can plug it directly into the 9-pin female connection on the profiler engine.
-
Connect the USB end of the USB/RS232 cable to the USB port of the Laptop or PC. Ensure the correct drivers are installed prior to plugging in the cable.
-
Ensure the 12V DC power cable to the profiler engine remains connected.
-
-
-
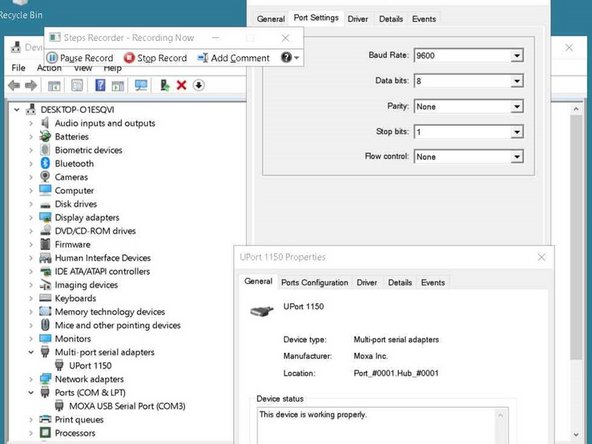
If you are using a MOXA USB-Serial Converter, ensure the Com Port and Serial settings are correct, by selecting the following settings found in Windows "Device Manager". COM Port will vary on each PC. Baud Rate: 9600, Data bits: 8, Parity: None, Stop Bits: 1, Flow Control: None
-
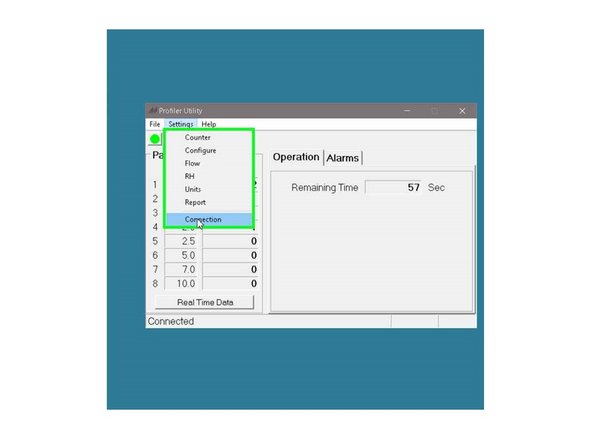
After Running the Profiler Utility, go to Settings --> Connection
-
Ensure the Connection Settings for Port number and Port Speed match the Device Manager Settings. Click OK
-
Ensure the window shows "Connected" in the bottom left hand corner
-
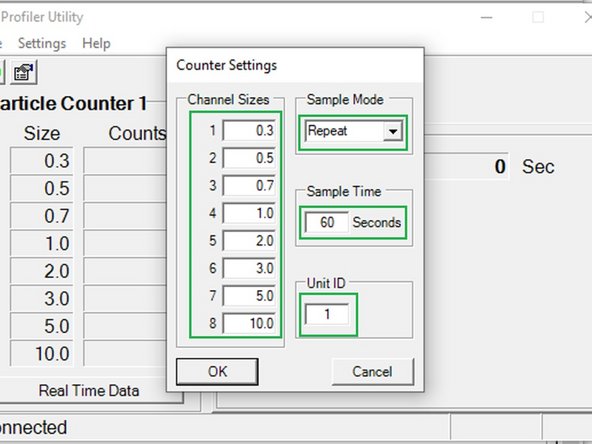
Go to Settings --> Counter
-
Ensure Settings are identical to the "Counter Settings" shown in the thumbnail
-
Click OK
-
-
-
After settings have been saved from the previous step, remove 12 VDC power cable from the Profiler engine for 10 seconds
-
Plug the 12 VDC power cable back to the Profiler engine.
-
For further support, contact Technical Support.
For further support, contact Technical Support.


