
Introduction
This procedure applies if you have an existing/older MOXA modem you want to install in your Aeroqual monitor. In this situation, you need to upload the correct firmware and Aeroqual Cloud configuration settings onto the modem before connecting it to the monitor.
If you are using the MOXA G3111 HSPA supplied by Aeroqual, you don't need to do this procedure and can go straight here.
-
-
Connect the modem to your PC using an ethernet cable.
-
Open up your internet browser and enter 192.168.127.254 in the address bar. This is the local IP of the modem.
-
If the MOXA configuration interface doesn't appear, make sure the IP address is set to 192.168.127.XXX.
-
If you still can't connect to the modem using 192.168.127.254, the default IP address of the modem might have been changed. In this case, reset the modem to its factory default settings by pressing the small reset button next to the ethernet port. You can do this with the modem powered. The modem will beep and restart.
-
-
-
When you can access the MOXA configuration interface, check the Firmware version on the overview screen.
-
If the firmware is 1.5, do nothing! You have the correct firmware version.
-
-
-
If the modem's firmware version is earlier or later than 1.5:
-
Contact Technical Support and ask for the following file: ocg3001_1.5_Build_13091318.rom.
-
Once you have the file, save it to your local drive.
-
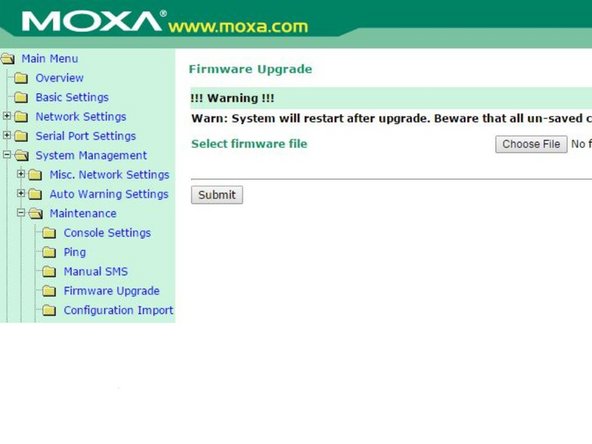
Go to the Firmware Upgrade screen (Main Menu > System Management > Maintenance).
-
Browse to the file and click Submit.
-
Check the overview screen now shows the firmware version 1.5.
-
Firmware version 1.6 and above will not work and must be changed to 1.5.
-
-
-
Download one of these files:
-
-
-
You can tell which model you have by examining the front of the modem.
-
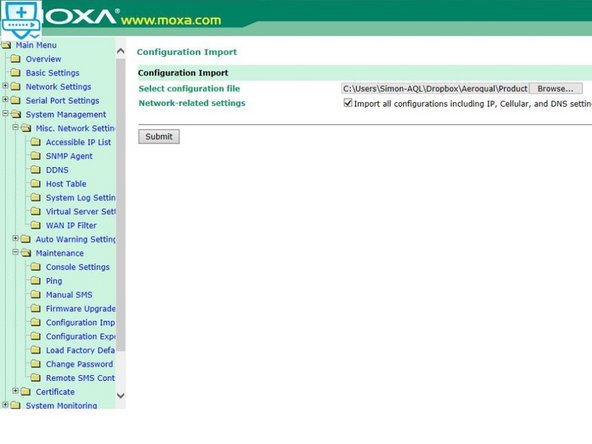
Go to the Configuration Import screen (Main Menu > System Management > Maintenance) and browse to the file.
-
Check Import all configurations including IP, Cellular, and DNS settings.
-
Click Submit.
-
Click Save and restart.
-
-
-
Go to the next procedure to complete the preparation and installation of your MOXA modem.
-


For further support, contact Technical Support.
For further support, contact Technical Support.
Cancel: I did not complete this guide.
2 other people completed this guide.
