
Introduction
Ozone is a highly reactive and unstable gas which means it can’t be put into a cylinder. Ozone must be generated by an ozone calibrator and delivered directly to your monitor. Aeroqual recommends the Model 306 Ozone Calibration Source from 2B Technologies. You can buy this directly from Aeroqual (part number AQM O3CAL).
Aeroqual recommends you ‘run in’ your ozone calibrator when you first receive it to ensure it generates stable concentrations of ozone. This only needs to be done once. Set it to deliver 200 ppb and run it for 12 hours. Vent the output through a fume hood or similar extraction device.
The Ozone Calibration Source doesn’t have a scrubber for removing VOC so consider this when deciding where and when to calibrate your ozone module. Laboratories, factories and some outdoor environments have high VOC levels which impact calibration accuracy. If needed, contact Aeroqual for advice before you begin.
The factory calibration certificate from 2B Technologies will specify two calibration gain settings for your ozone calibrator. You must select and programme the appropriate gain setting into your calibrator before you begin.
This procedure assumes you are familiar with how to operate the Ozone Calibration Source. For information, download the user guide at the end of this page.
Note: For monitors using the Ox/O3 system to measure NO2, you must calibrate the Ox and O3 modules before any other modules.
To understand how often you should perform this service activity, click here.
-
-
This guide assumes you've already done a zero calibration and a span calibration on your other gas modules.
-
If you haven't already done so, turn on your Ozone Calibration Source and set it to deliver 0.1 ppm ozone. This allows time for the lamp to stabilize at 0.1 ppm.
-
The calibrator will display Temperature Set when it's stable.
-
Wait for a further 30 minutes to ensure the span concentration is stable.
-
-
-
Connect the outlet on the back of the Ozone Calibration Source to the tee on the gas inlet.
-
Cap (close) the other side of the tee.
-
This is required because the ozone calibrator has an internal tee that vents excess span flow.
-
Double-check the connections are safe and secure.
-
The Ozone Calibration Source isn’t IP rated, so you need to take care when operating outdoors.
-
-
-
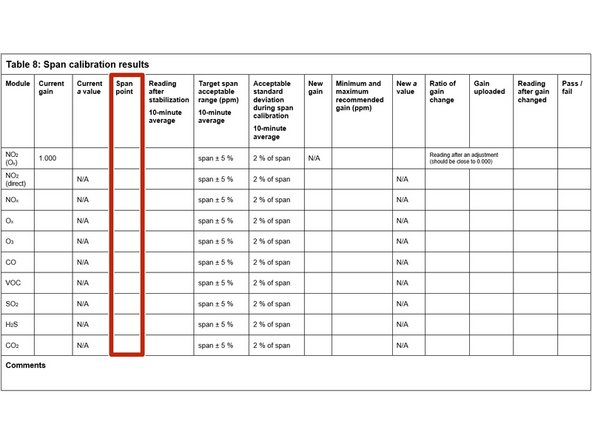
Follow steps 3-10 in the perform span calibration guide to complete the ozone calibration like you would any other gas.
-
-
-
Disconnect the Ozone Calibration Source from your monitor and connect the AirCal 1000 calibrator.
-
Remove the cap from the other side of the tee.
-
Flow zero air for 10 minutes to purge (clean) the gas lines.
-


For further support, contact Technical Support.
For further support, contact Technical Support.
Cancel: I did not complete this guide.
3 other people completed this guide.
Attached Documents
