
Introduction
Field calibration of your particulate monitor is typically not required. However, it may be appropriate if you have very high data quality objectives, such as research studies that need to demonstrate traceability to another monitor.
A comparison with a reference instrument can also be undertaken when your Aeroqual monitor is first installed. This ensures readings from the Aeroqual monitor are adjusted for the local particle type, color and morphology.
The adjustment or correction taken after comparing the data from two monitors is commonly known as a ‘K-factor’. The procedure for generating a K-factor involves co-locating the Aeroqual monitor next to a reference monitoring instrument.
Gravimetric instruments are considered the most accurate, but BAM or TEOM instruments deliver data faster and don’t involve lab work.
-
-
Enter service mode so any fluctuations in the data caused from this activity can be excluded from air quality reports.
-
-
-
Install and commission your Aeroqual monitor alongside your reference instrument.
-
Preferably position their inlets within 10m of each other and at the same height. At reference sites using a monitoring shed, the roof top of the shed is usually the best location.
-
Operate both monitors together for 1-2 weeks (no shorter than 48 hrs).
-
BAM / TEOM are continuous methods, meaning more data can be collected in a shorter period. Gravimetric instruments need to be run for a longer period as they operate on 24-hr averages (1 data point per 24 hrs).
-
As a general rule, the longer you co-locate the monitors the better, as this gives you more data points and more confidence in your field calibration.
-
-
-
Collect the data from both monitors.
-
Using Microsoft Excel, remove any odd spikes, maintenance, errors and automated zero calibration data.
-
If your reference instrument is gravimetric:
-
Send your filter/s to the lab for weighing.
-
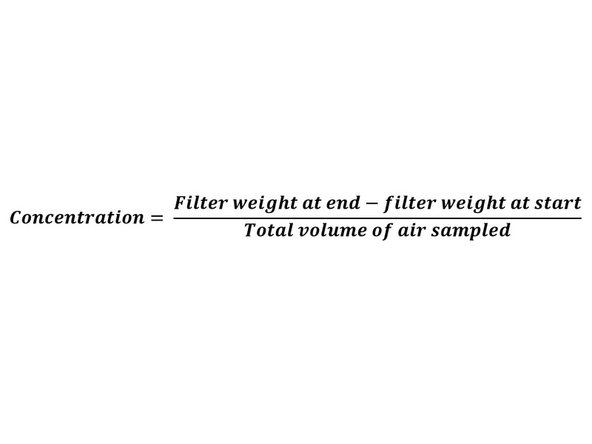
When the lab results return, calculate your concentrations using the equation shown.
-
You don't need to do this for BAM / TEOM instruments.
-
-
-
Select an averaging period, eg. 1 hr or 24 hrs, for the period of your co-location (24 hrs is usually appropriate).
-
BAM and TEOM monitors run continuously and data is available at as low as 10-minute averages. This data can be noisy, so we recommend 24 hr averages if PM levels are low.
-
Calculate averages for your Aeroqual monitor and the reference instrument using the equation shown.
-
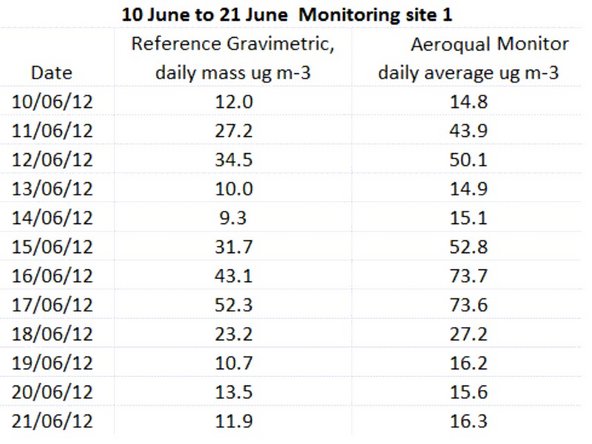
The goal is to create a spreadsheet with 1 column of reference data and 1 column of Aeroqual data, in the averaging period you selected. Zero check data should be included as a point.
-
-
-
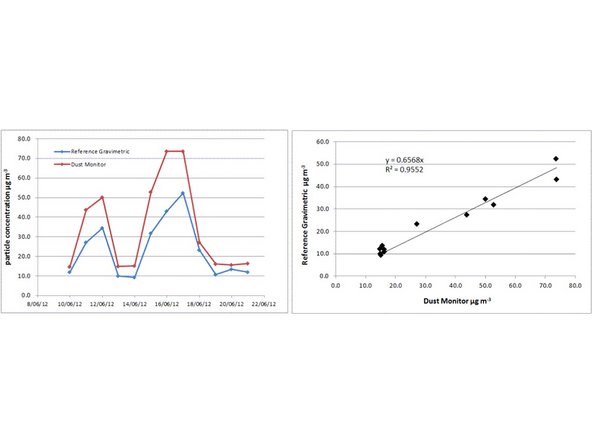
Plot your 2 data sets in an x-y scatter plot. Add a trend line and equation.
-
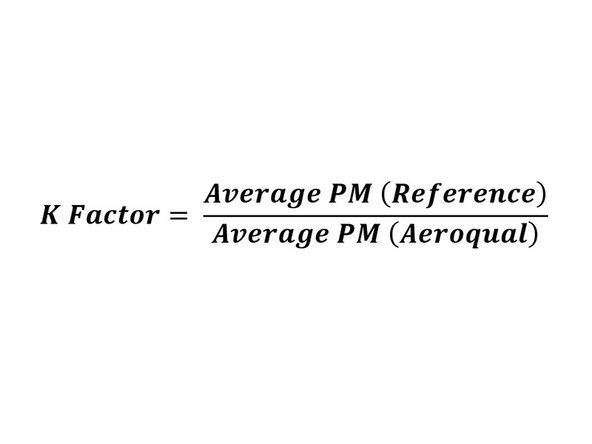
Calculate the K-factor (calibration curve) using the equation shown.
-
In this example the Aeroqual monitor is reading higher than the reference instrument. The slope of the calibration curve is 0.6568.
-
-
-
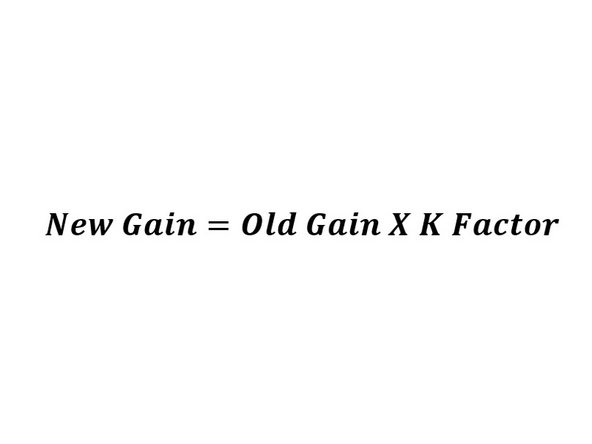
Calculate the new gain using the equation shown.
-
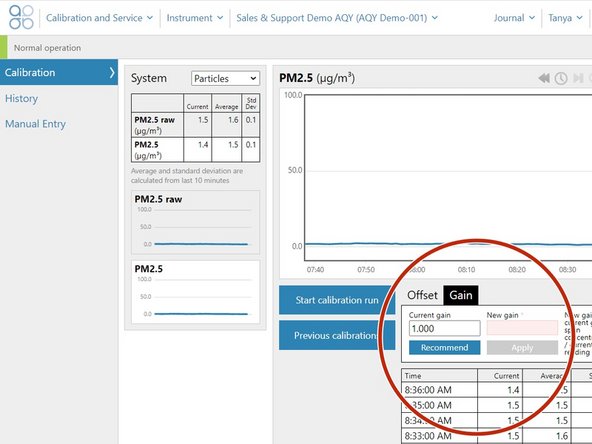
Go to the Calibration and Service app and select Calibration from the side menu.
-
Select your PM channel from the System panel and enter the new gain in the details panel.
-
When you start typing in the New gain field, the Apply button is enabled.
-


For further support, contact Technical Support.
For further support, contact Technical Support.
Cancel: I did not complete this guide.
3 other people completed this guide.
