
Introduction
A leak can be caused by loose connections, worn seals (o-rings) or split tubing.
If a leak occurs, this can affect the flow rate which will have a big impact on the accuracy of the measurement.
To understand how often you should perform this service activity, click here.
Tools
No tools specified.
Parts
-
-
Enter service mode so any fluctuations in the data caused from this activity can be excluded from air quality reports.
-
-
-
Adjust the sample flow by pulling the adjustment knob outwards, turning the knob to increase/decrease flow, and pushing the knob back in to lock when desired flow has been reached.
-
Fully open the sample flow adjustment valve, which is located on the face plate of the pump module.
-
On older monitors, the sample flow adjustment valve is positioned at the bottom of the enclosure under the PDI cover.
-
Block the purge flow by pinching the purge tube.
-
On older monitors, block the purge flow by disconnecting the purge line and capping the purge line and ports with luer caps.
-
-
-
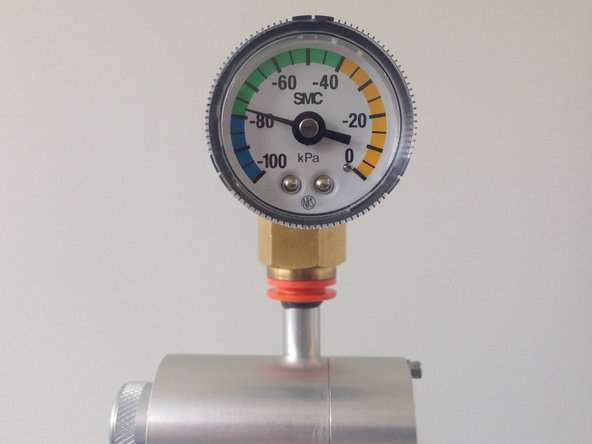
Remove the TSP inlet and place the vacuum gauge on the inlet.
-
Wait for the gauge to stabilise.
-
The gauge should reach at least -60 kPa while power is connected.
-
-
-
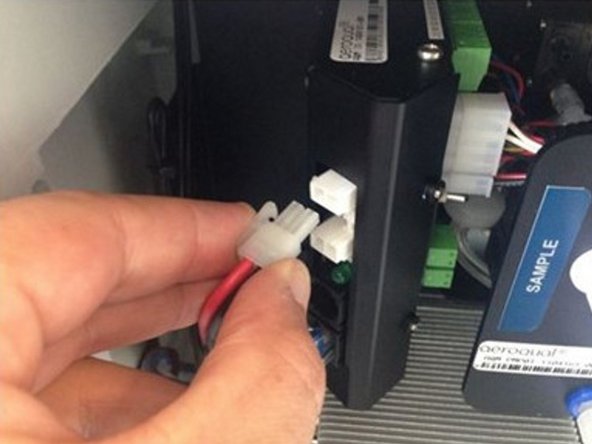
Stop the sample pump by pulling out the black and red power cable from the electronics module.
-
Count how long it takes for the pressure to change by 10 kPa.
-
If the pressure change (leak rate) is greater than 10 kPa in 10 seconds, you'll need to check for loose connections, worn seals (o-rings) or split tubing.
-
For example, if the needle moves from -70 kPa to -60 kPa in 20 seconds, this is OK, but if if moves from -70 kPa to -60 Kpa in 8 seconds, this indicates a leak.
-


For further support, contact Technical Support.
For further support, contact Technical Support.
Cancel: I did not complete this guide.
2 other people completed this guide.
